Tuesday, May 6, 2014

Birdbath, bed and kerb

A month ago I did some reshaping and had moved the birdbath under the Allspice tree.  Regular visitors, esp. Red-whiskered Bulbuls did not locate it, but preferred the one I had kept under the tap opposite to it.  The tailorbirds, great tit, mynas and crows had starting using.  The new place did not help me either because it was not visible from my room window.  It was time to move it again.

The platform for keeping pots had to be lowered because I intend to keep the larger pots in a line which will be heavier to handle.  Picture below is of February.  Keep an eye on the vertical poles - they also moved in.  See where the birdbath was placed [next to the wall].
[Click on pictures to biggify them]


See the differences here.  I have removed all the stones under the pot-platform, lowered the level.  I placed bricks and removed stones I had stocked. The stones again moved out.  Birdbath moved and a brick-step for placing pots next to the wall. 


Birdbath in place. 


Pot-steps.


The arch was placed next to the barrel where Cherry Tomatoes will grow.  Seedlings are ready. Garlic Chives came up to a pot [bottom right] from the ground.  See the round bath below the tap - which is where bulbuls are coming.  


See now where the vertical poles are.  I took them in so that they can form side-poles to a possible screen to grow some vine on it.  I've already placed the pots - the ones I had, now at lower level. Bigger pots will replace them in a month.


Picture on left shows the birdbath and bed around it - Zinnias and Cosmos will grow here.  Part of it is having Cilantro [coriander] now. The small window at the back is from where I can see the birdbath now. I repaired the window shutters too.  I can see it too from the nearest window too, next to the rain pipe to the right.  Picture to the right is the passageway between the house and My Yarden! See the poles gone in. 


Another view of the passage from a lower angle. The wooden beam was used as a lintel in the old structure we demolished for the new house [door of it is partly seen at the back]. Bullocks pulled it in the limestone grinding mill when the house was being built, 101 years ago!  The holes in it indicate its use. Luckily it is not damaged by termites.


I can see like this from my room window, through the new mesh.


I was sipping tea Sunday evening when a brilliant idea crossed as I was looking the kerbed bed.  It was crying for improvement. This picture is a work-finished one.  I had used smaller and thinner kerbs. I had better ones. See. 


These floor tiles made of clay were salvaged from the half portion of the house which was being demolished by the new owner following sale by brother. I pulled many such tiles from the debris for recycling.  But about 80% went away to landfills :(.  They were mostly from what once was our bedroom when I was in that portion.  
Now I used these for my kerbs. 


The other side - they were made in The South India Industrials Ltd. more than 100 years ago! 


Close-up of the laid tiles. I had tied a thread from end to end for level index.


I have some more in stock.


Deadwood makes a nice perching place for the birds before they step in to the bath.  They like to see around and confirm their safety before they dip and to wriggle water out after dipping.  I put new sticks through it.  They also perch on other things.


My friend Bev asked in a mail how I move that stone birdbath! 
I wrote: Mmmmmmm...mhh.

But let me explain the steps.
Emptied the water. Tilted to its long side, mmmm... holding with both hands, resting on the tummy and walked a few steps, ligaments connecting the jaws and collarbone [not precise] showing up, I kept it carefully on the bench you see there towards the left.  Ooof.
I scrubbed chirrrr, shirrrr, ushhhh, with soap and brush, left it to sun-dry as I completed other things.
The birdbath table top - a concrete slab [once a water tank lid!] - rests on 4 brick pillars. I had to lift the slab to place it carefully on the pillars.... again some mmh...mhhh. This was heavy too.
Tabletop ready, I brought the bath following the same steps.... but now using a few more Mmmmmm's to draw energy as I was a few calories short by then!  :)  

Filled rainwater from the barrel - from Saturday night's heavy rain. The birdbath brim level was perfect to a spirit level requiring no fine-adjustments! 

I hope the birds will locate and like the new place while I can see from the window - I forgot to tell that I also changed the window's insect mesh which was asking for a replacement. 

Monday, April 21, 2014

April sees some good work

This post will be full of pictures. Click on them to enlarge.

There was nothing much to do in the main Yarden area, which is now covered by shade net to protect from the beating summer sun.  But some useful things were done.  The area is seen on the right. The passage next to it was cleared of weeds which grew from the few light rains last month and early this month. A morning glory flower blooms from a volunteer plant. 


Same from opposite side.  See shade net on top, the filtered sun - see how much it filters. I had also done some exercise to put proper downspout to the rain pipes.  Now water will not splat from the bay balcony on to the passage here. It will smoothly fall on concrete.


I tied jute thread to support the Jaquemontia vine as it grows. I had not done it earlier.


Notice a small plant between papaya on the left and plumeria on the right.  It is an ordinary red hibiscus. It was in a pot for 5 years.  In fact, it was the host plant for some variety of hibiscus I had bought, but the grafted plant died and this survived. I made way for it by clearing up the extra rhizomes of Ginger [kasturi arishina].


I used a vintage stone cooking pot to keep a pot with Daylily in it.   It is about to bloom. It is Hemerocallis fulva.


Some light rains brought up the Pink Rain Lilies. This was a biggie!


The water lily which had grown too long and big in roots have been removed. The old plant may not survive. It is in a tub.  I cleared some silt and removed the extra water lettuce and hyacinths. I want to keep a water lily back.  I have one or two smaller ones floating around.


There was a need to use this area properly.  First I moved the compost pits a couple of feet away.  It was here earlier.  See carefully to the left of the plant in the white sac.


See where the pits have moved.  I cover one half with a zinc plate.  With this, I created a bed that has edges on both sides. I moved ginger [edible variety] next to the papaya, I brought a sugarcane plant from the small cover with soil and planted it behind the pits.  And the 'Big red Canna' next to ginger.  This area now looks organized.  Nothing much grows here because of the presence of many small roots from the three trees within 12 feet from here. 


Same area, another angle.


Junk cum firewood cum empty pot area in that corner also is somewhat organized now as I have cleared up "true junk"!!  *Smile*.   See some morning sunlight on the wall - red!


See the pot stand in the foreground here. It was kept away in that junk area. Brought it out for use.  I painted it too.


I closed my previous post mentioning about the new tomato ladders.  I am extremely thankful and grateful to Ramaswamy [Ramu] who did the welding work.  I had cut the pieces to size and given him.  They are left overs from our new house project - construction steel - some are 6mm and some are 8 mm. 

I had decided to paint all the ladders, many of which were done by Ramu the same way.  This way, I cleared up the 'junked iron rods'.  They will be put to use or stored neatly.  "Cilantro Green" paint was available with me. April 20th I took this up and it took me 4 hours to do this job. 
See pictures:

All items kept ready for painting. See paint tin on the high stool.


The new tomato ladder is about 7 1/2 feet high.  Six of them. All painted. See also the 'trellis gate' and pot stand. The arrows of the trellis gate is from our old gate from the old house where I grew up. So it has some history. I salvaged the arrows from that wooden gate and got this trellis made using some of them.


Another view. 


I brought out the smaller ladders also, from the tool shed.  I used rag to paint them. 


Rag swab as brush. Notice the indelible ink mark on my thumb - 2014 General Elections - for having cast my vote [on 17th April]. 


Thursday, March 13, 2014

Some March Updates

Unusually, it rained heavily on 2 days in the first week of March.
Rain lilies sprang up, but in many agricultural lands, there were huge crop losses.  


The moisture supplied by the rain was just what I needed [because scooping soil is easier and no dust flies] to embed a few left over odd pieces of stones on the pavement and at the entry point to the Yarden/Eden.   I was waiting for this modification till the rain barrel was in a better place.  I had moved the barrel which I mentioned in my last post.  

This is the passageway path, after the paving.  To the right is the entry to the Eden, slightly raised, but not evident in this picture. 


Now I'm inside the Eden.  Look at the stones laid beneath the rain barrel - entrance.


It was like this last month.  Observe the area beneath the barrel. 


Another view of the entrance from my sitting bench.  


Sitting bench faces the entrance. I have to climb 3 inches on that stone.  


My wild lawn - nothing but Cynodon dactylon - became greener after receiving rains.  One of my 3 tyre planters are seen in this picture [foreground].  I have kept Billbergia pyramidalis in this one. 


I am preparing materials for my Tomato ladder and other support frames while junk is converted that way.  The progress will be updated.

Tuesday, March 11, 2014

My birdhouse - a flop

Inspired by other gardeners on Dave's Garden site where members had shared their beautiful birdhouses and colourful birds, I wanted to try one for our smaller birds here.  So I looked for some easy projects to make one.  I found a simple model for which just four pieces of wood, a plastic bottle [in cylindrical shape] and a stiff wire were required. For the wood, I used the crude pieces of my old toy projector [an old story - click here] and the other materials were on hand. 


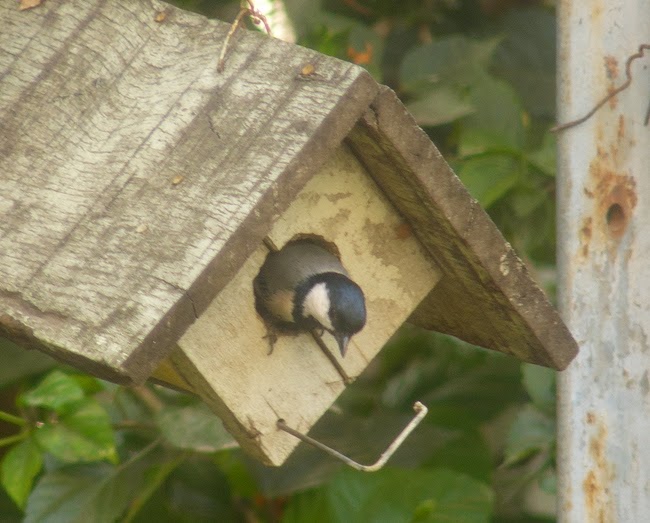
In all expectation, I hung my birdhouse on the fiddlewood tree.  Many weeks passed, but I found no visitors. I was wondering what was wrong with it.  So I changed the location and just removed it to a place, dejected.  Now it was hung low on a hibiscus plant. 


I was in the kitchen when I heard this little bird calling.  When I looked out of the window, I got the scene I yearned for - a bird in my birdhouse!!  After jumping a hop with joy, I ran to arm myself with the camera and carefully, partly opened the second door of the toilet that opened out to the yard side. The Great Tit was exploring possibility by surveying it!  In fact, it turned out to be the only time it or any other bird visited!  :( 


Its present fate....waiting to go into the boiler oven!  I never made another.  

Monday, February 17, 2014

Drying fallen leaves in onion bags!

My friend Bev in Mexico once wrote about what she does about the leaves that fell from her olive tree in her garden.  It really thrilled me.  We were exchanging some gardening issues when this point came up.  It was September 2013 and the rainy season.  I had written about the huge pile of the big leaves of our almond tree that come down twice a year.  Some excerpts from that mail exchange:

Bev wrote:
So you have lots of leaves with no where to go?  You can send them to me.  They make good mulch for the garden.  What i do with leaves is dry them in bags outside in the sun.  The bags are mesh like this... the bags usually carry quantities of fruit are orange plastic mesh.  I like to get the leaves really dry so they are crispy and these bags are perfect for drying because they let the air flow through.  The reason I like to dry the leaves first is to make sure they are not infested with bugs or worms, etc.  When I know all the leaves are nice and crispy, I go around the garden shaking the bag up and down where I want the leaves to be.  I can make pathways through the dirt that way and scatter dried leaves around plants etc.  Wow I wish I had all those yummy leaves! [She refers my almond leaves.]

I wrote back:
This is an impressive idea Bev. I may do it and I need some storage space for these bags if I do it.  
Almond tree leaves are large.  We do have the net-like onion bags which you mention.  I don't have it at home.  They can be easily bought cheap from the sac sellers in a particular street.  

Bev responded:
Dinu, you don't need storage space.  The best place to hang them is outside in the sun.  The bags weigh nothing even full of leaves.  I hang them (or tack them) to the sunny walls where they will get sun and air. You want the leaves nice and crispy, not moldy and wet.  You can hang them on the outside of your house, anywhere that is sunny.  I don't have any hanging now because it is raining, a lot.  We are having rain from hurricane Ingrid and tropical storm Manuel for at least the next two days.  I can take a photo of the bags I use and send it in the next email.  You can use any type of mesh material that will allow air to circulate. 


Bev again came back in the next email:
I have never actually sent anyone a photo of a bag before, but here it is. It is not very large but will hold quite a lot of leaves.  I'm sure there are larger mesh bags to be found.  I have 3 or 4 of these bags but don't have such an abundance of leaves as you do (in this photo you can also see how miserable and wet it is outside :(  I do like to use the dried leaves crushed up, but don't have any.

I had been mulching the beds of hibiscus and other plants with leaves that come down in February.  Some of those would be chewed up by the termites!  Never mind, they aerate the soil.  The Fiddlewood tree and the Aegle marmelos tree also shed at this time, but once a year.  They are smaller leaves.  I burnt some leaves for the hot water boiler, mulched some beds and preserved much this time.  I wanted to follow the Bev method.  Got 4 bags for ten rupees each Saturday last.  Filled two of them and stored in the scooter shed.  Two gunny bags were also bought but it is another option because it has a weaving much tighter.  The small pieces of dry leaves will be fantastic organic matter for the soil. 

So here we go, Dinu's Bevbag!

Beds widened, important changes

I pick up the strings from the last post. 

First thing was to move the birdbath from near the garden gate which I did.  The bird bath made way for the rain barrel and went up beside the Allspice tree as planned.  The rain barrel [foreground] now shields view of the garden to some extent while creating some more space inside the yard.  See picture below. 


It was like this in March 2011.


A simple arch I had got done using construction steel some years ago was not being used.  I brought it in with a hope of growing tomatoes around it. In the picture below, the birdbath on the brick wall is in place. I had thought of a step wall, but this was more suited. Hollow bricks to hold a concrete slab [which was originally our cement water tank lid] on which the stone birdbath is kept.  

During this time, I have removed all the plants except a couple of tomatoes near which came the arch. 


Now that the bed width had shape had been standardized, it was time for laying the mosaic stepping stones in the centre pavement.  I had made the stepping stones myself [click] using little waste tiles [removed from our workplace floor - see another post]. These had been waiting for a proper use after they were removed during the last 3 years, reasons I need not repeat.


I embedded them.  Six in number.  In between the gaps, I put clay tiles.  

See the birdbath.  The bulbuls and other birds will find its new location soon.  The rain barrel is now placed conveniently, out of the way, but the outlet is accessible.  


The bulbuls were seen using the one which they did not use when it was done.  The round birdbath, now kept under the tap - see a part of it in the picture below [on the left edge].


I had already removed the Thunbergia plant and its roots to make way for Senecio confusus seeds about which I mentioned in the last post.  I sowed a small part [on 16.2.2014] to see if they germinate and start well in the summer months.  


I had made the area clear by moving the Evolvulus 'Blue Daze' - a ground cover plant to the other side of the birdbath at the foot of the Allspice tree. 


Picture above - I have already sown the seeds of Senecio after cleaning the soil reasonably of stones and adding a liberal amount of kitchen compost. The soil where the Thunbergia grew appeared to be nice. I have kept the plants in covers [for future plantings] around where I sowed, to keep the soil around also moist. Picture below is a close up view. I separated Fortnight lily seedlings from one cover into 5-6.  There are a few more I put in temporary soil near the tomato plant. 


So it will be thrilling to keep a watch on Senecio.  So much for this post. Almost all set now.  If summer sun beats on the other half, I am ready with another piece of shade net for plant protection.